Cookbook page 1
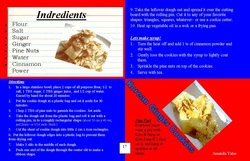
Our next project we had to make was a cookbook. This was our final project that was printed out. Everyone in the class got a country and had to make 2 pages of a recipe for the book. My country was Korea. For this page the recipie I did was Korean Ginger Cookies. In the top left hand corner is the ingredients that you need in order to make the cookies. In the bottom left and top right corners are the directions on how to make the cookes. And finally in the bottom right is the name of the food, and a picture of the food. There is also a picture of the cookies in the top left hand corner where the indreidents are. I had to make the pictures of the cookies not look like I got them off the internet. So I put them into photoshop and i painted them over with the same color paint as the picture was when i saved it. Them to make the sugar on thwe bottom right picture i made little white dots, and had them sprinkel off the spoon. The also on the bottom picture i used the clone tool to clone the spoons into the picture to make it look like the sugar is aprikeling off of the spoon. I also used red and blue squares to use as the backgrounds because red and blue are the colors on the Korean flag.
Cookbook page 2
For the cookbook project, we had to make two pages about korean foods and this is my second page. For this page I shoed the recipie on how to make Kalbi (Korean BBQ Short Ribs). Once again i used for corners of the page to put stuff about the food but I kept the background ll white this time. In the top left hand corner is the directions on how to make the food and what order. The bottom left hand corner is a picture of the sohrt ribs. I had to do the same thing to this picture that I did in the first page. I had to make it look like it did not come off of the internet. Then in the top right had corner is a picture of the korean flag. To do this I tried to copy the Korean flag. I made a circle and the drew the line down it and made it half red, and half blue. Them i made the lines that are in the corners of the flag. Then lastly in the bottom is the ingreients for what you need to make the short ribs.
Tie Dye shirt

This is the final project we did in grachpics class. This was my favorite project we did in class because I have never tie dyed before. This is not my shirt that I did. I got this shirt off of the internet. My shirt was orange, black, blue, and pink. But it id have the same design as this shirt. This project took about 2 days to do. First we had to soak the shirts in water then we had to fold them into the design and put a rubber band around it. Then we sprayed it with any different colors thatwe wanted to. Then we had to let it sit overnight in a plactic bag. The next day we had class we had to take the shirt out of the bag and let rinse it out again to get the rest of the die out. Thewe habd to hang the shirt u on a line to let it dry. Then we took the shirts home and rinsed them in water and vinigar to get the remaining dye out. Then after that we had to wash it and dry it by itself. Then we could wear it. I wore mine to school last week. It came out nice. I enjoyed doing this projec. Mr.Adams helped out by showing us a video on how to tie dye. It was a long process but i enjoyed doing this project.
